

F.6.1 Draft: Populate Data for Master/Sub
Contract

Description
The Contract Administrator
enters the information, attaches all necessary attachments, and workflows
the document to the Project Estimator
for funding/WBS assignment for a new contract that needs to be executed.
Outcomes
Once a Contract is initiated and submitted, it moves to the Project
Estimator in the Funding/WBS Assignment state.
Prerequisites
 The Vendor must be set up in NexGEN prior
to the Contract Administrator starting a Contract by using the
Vendor Setup Process. The Vendor Primary Contact (Vendor RI) must
be set in the project as well. The Vendor must be set up in NexGEN prior
to the Contract Administrator starting a Contract by using the
Vendor Setup Process. The Vendor Primary Contact (Vendor RI) must
be set in the project as well.
|
Detailed Steps
Step 1:
Click
Contract Management
on Navigation Pane to expand.
Click Contracts.
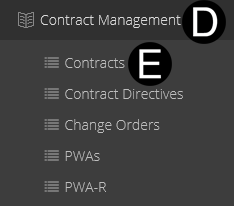
Click  .
.
 If you
are a Contract Administrator with only access to one of any of
the selections your data will auto populate. If you
are a Contract Administrator with only access to one of any of
the selections your data will auto populate.
The
auto populate will be based on the selection in the Project Pick
List. |

Step 2: Complete all required fields in Select Context area.
A. Select/Verify
Org from the list.
B. Select/Verify
Program from the list.
C. Select/Verify
Project from the list.
D. Select/Verify Sub
Project from the list.
E. Click
Create.
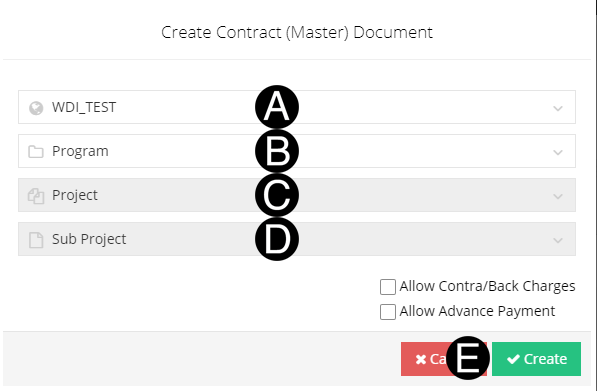
If
multiple sub-projects are required select "shift key"
and highlight all sub-projects required.
All
sub-projects that may need to be part of this contract must be
added here even though not awarding yet as you will not be able
to add sub-projects in the change management processes (i.e. JFC
and CD).
If
contract terms and conditions allows for Contra or Back Charges
at any time during the life cycle of the contract check the box
to Allow Contra/Back
Charges.
If
contract terms and conditions require advance payment check the
box to Allow Advance Payment. |

Step 3: Complete all required fields.
Purchase Org/C/BA/Plant controls
the environment of SAP Pandora accesses and creates the Contract/PO.
Contract
Type selections are filtered by the Purchase
Org/CC/BA/Plant selected. |
Type a Document
Title in the field.
Select a Purchase Org/CC/BA/Plant
from the list.
Select a Purchase Group from the
list.
Select a Material
Group from the list.
Select a Responsible
Individual/Studio from the list.

Select Contract
Currency from the list.
Select Contract
Type from the list.
Select Type
of Request from the list.
Select Contracting
Method from the list.
Type a Submittal Response Date
in the field (optional).
Type a RFI Response Days in the
field (optional).
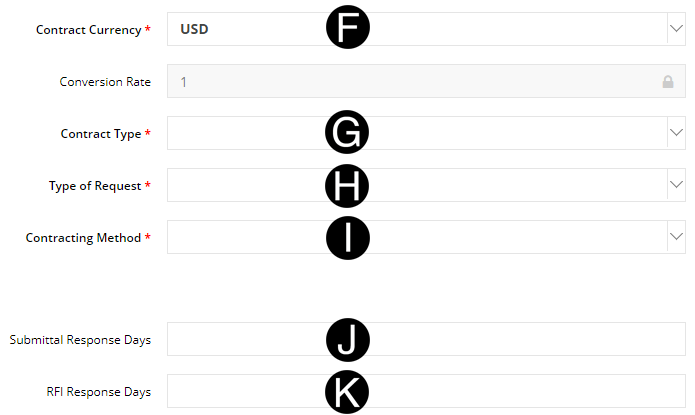
If
Contract Currency is any other than Project Currency you must
enter in a Conversion Rate that can be obtained from your Finance
Representative. |
If
No Signature Required is selected under Type
of Request the document will bypass the DocuSign process
in NexGEN. Non-DocuSign Documents will move to Fully Executed
state when No Signature Required is selected.. |
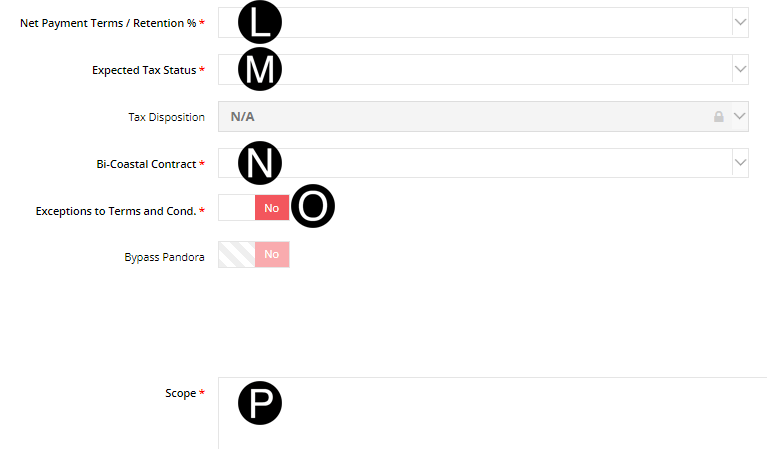
Select New
Payment Terms/Retention % from the list.
Select Expected
Tax Status from the list.
Select Bi-Coastal
Contract from the list.
Toggle Yes
or No in Exceptions
to Terms and Cond.
Type Scope
of work in the field.
Schedule
Start will auto populate based on first date of all the
Sub Project Details.
Schedule
Completion will auto populate based on the last date of
all the Sub Project Details.
Contract
date is defaulted to the date you start the contract and save
as on draft. |

Step 4: Complete all required fields in Tax Details
Select Work Type from
the list.
Select Plant from the
list.
Verify Final Delivery Address
or enter final delivery address.
Select Material Group
from the list.
Select Tax Usage Code
from the list.
If additional detail rows are needed click Create
Row.

GL Code will auto populate based
on the Material Group
that is selected. |

Step 5a: Complete all required fields.
Select a Performing
Company from the list. The Performing
Contact will auto populate.
If a
Vendor Is Participating,
they must be participating on all projects. |
Toggle Yes or No in Work Performed at WDI?
Work
Performed at WDI: if Yes, this means Contract is a staff extension
and should be routed in SharePoint and a PWA in NexGEN and Vendor
should enter time in to SAP except when it is a multi-party agreement. |
Toggle Yes or No in Sole/Preferred
Single Source?


If Contract
Vendor is in the Approved Countries for DocuSign, and the Contract
type is either California or Florida DocuSign, will be part of
the process. Making the DocuSign Authority section a required
step in Contract Creation.
NexGEN DocuSign
Quick Reference Guide |
Step 5b: Complete DocuSign Authority
- Select WDI Signatory
from the list.
- Select Vendor Signatory
from the list or Click Add New Vendor Signatory to add different signatory.
A
Vendor Signatory person can be added if not part of the drop-drown
by clicking Add New Vendor Signatory
and adding them in.. |

 Under Financial Summery Section the Contract
Total field name is a dynamic title and will vary based
on Tax Disposition selection.
Under Financial Summery Section the Contract
Total field name is a dynamic title and will vary based
on Tax Disposition selection.
|

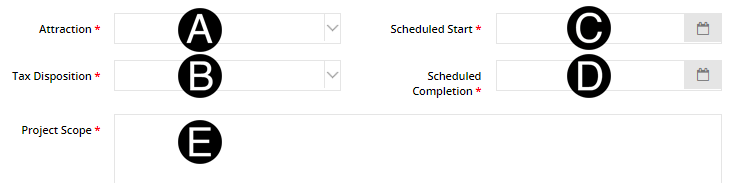
Step 6: Project Details for Sub-Project
Attraction
will auto populate based on the Sub Project selections.
If
Contracting Method
is Fixed Price, enter Fee Total. If not Fixed Price, enter
Units and Rate
in the field.
There
will be tabs for each Sub-Project selected during initiation that
need to be completed when there are more than one Sub-Project. |
Select Attraction
from the list.
Select Tax
Disposition from the list.
Select Schedule
Start from Date Picker.
Select Schedule
Completion from Date Picker.
Type in Project
Scope in the field.

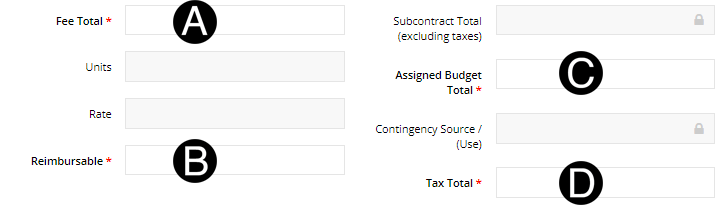
Step 7: Project Financial Details for Sub-Project.
Fee or
Units x Rate will be available depending on the Contracting
Methods selected in the Contract Section.
Contingency
Source/use will auto populate based on Assigned
Budget Total minus the Sub-contract
Total.
Subcontract Total field
name is a dynamic title and will vary based on Tax
Disposition selection. |
Enter Fee
Total in the field.
Enter Reimbursable
in the field.
Enter Assigned
Budget Total in the field.
Enter Tax
Total in the field.
|
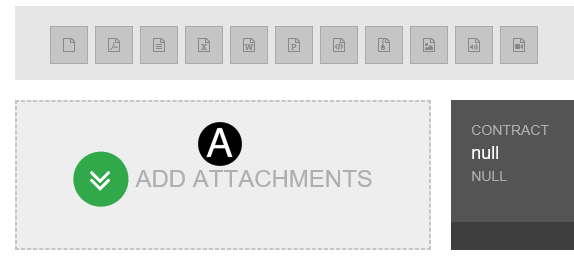
The document must be saved first before supporting Documents can
be attached. |

D. Click .
.

Step 8: Attach a document, sketch, or URL (if applicable).
Click ADD
ATTACHMENTS.
Select the file to attach (Holding down
Ctrl to select multiple attachments).
Click Open to attach the document.
The
attachments will not be visible by default to the Vendor. If
they need to be, you will need to unlock the eye icon on the attachment.
Visible to Vendor  or Not Visible or Not Visible . . |

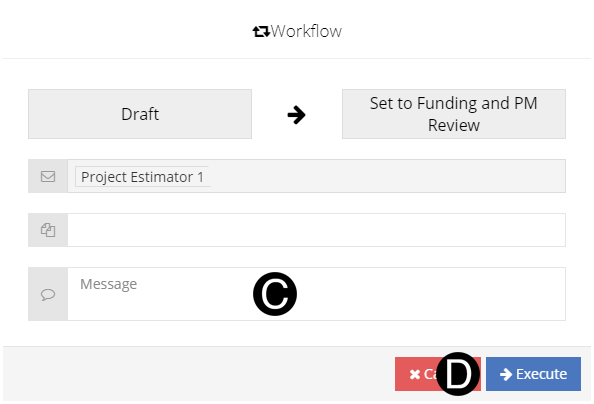
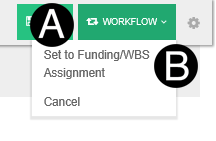
Step 9: Submit the Contract.
Click Workflow.
Select Set
to Funding/WBS Assignment from the list.
Type a message in the Message field
to include in the Email notification (optional).
Click Execute.